Openstack Horizon单独安装部署实践
作者: JAILBREAK(千里之外)

场景说明
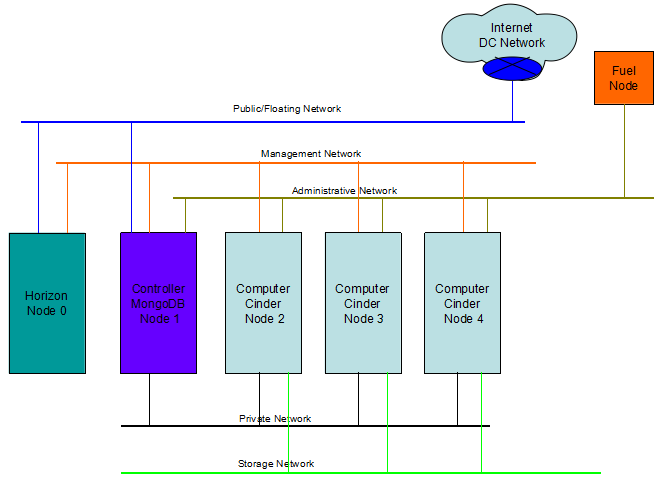
出于安全考虑,用户要求接入服务器单独隔离。作为Openstack云平台的用户入口,Horizon模块可以单独部署在独立的服务器上,仅仅通过管理网络向Openstack其他组件发起API调用。
实践说明
- 部署一套标准的Openstack环境node1 – node4,其中控制节点是node 1 (192.168.30.2/158.132.20.36),参见Fuel快速安装openstack的实践:第一部分小规模部署多节点,无HA
- 裸机部署horizon组件到node 0 (192.168.30.7/158.132.20.37)
- 配置horizon组件
实践步骤
- ISO安装Ubuntu 14.04
- 配置网络连接,注意VLAN的配置使node 0 能够连接到public network和management network
|
Configure the public network root@node-30:~# vconfig add eth3 112 root@node-30:~# ifconfig eth3.112 158.132.20.37/24 up root@node-30:~# route add default gw 158.132.20.28 root@node-30:~# route Kernel IP routing table Destination Gateway Genmask Flags Metric Ref Use Iface default 158.132.20.28 0.0.0.0 UG 0 0 0 eth3.112 10.20.0.0 * 255.255.255.0 U 0 0 0 eth0 158.132.20.0 * 255.255.255.0 U 0 0 0 eth3.112 192.168.30.0 * 255.255.255.0 U 0 0 0 eth2.3000 192.168.122.0 * 255.255.255.0 U 0 0 0 virbr0 Configure the admin network root@node-30:~# vconfig eth2 3000 root@node-30:~# ifconfig eth2.3000 192.168.30.7/24 up |
- 安装horizon
# apt-get install apache2 memcached libapache2-mod-wsgi openstack-dashboard
# apt-get remove –purge openstack-dashboard-ubuntu-theme
- Modify the value of CACHES[‘default’][‘LOCATION’] in /etc/openstack-dashboard/local_settings.py to match the ones set in /etc/memcached.conf.
Open /etc/openstack-dashboard/local_settings.py and look for this line:
|
CACHES = { ‘default’: { ‘BACKEND’ : ‘django.core.cache.backends.memcached.MemcachedCache’, ‘LOCATION’ : ‘127.0.0.1:11211’ |
5. Update the ALLOWED_HOSTS in local_settings.py to include the addresses you wish to access the dashboard from.
Edit /etc/openstack-dashboard/local_settings.py:
| ALLOWED_HOSTS = [‘localhost’, ‘my-desktop’] |
6. Edit /etc/openstack-dashboard/local_settings.py and change OPENSTACK_HOST to the hostname of your Identity Service:
| OPENSTACK_HOST = “192.168.30.2” |
- Start the Apache web server and memcached:
# service apache2 restart
# service memcached restart
这时候,你已经可以通过 http://158.132.20.37/horizon访问Openstack环境了。
SSL访问Horizon
为了进一步安全的需要,外部对Horizon的访问需要SSL加密。
1. Enable HTTPS:
a2ensite default-ssl
a2enmod ssl
2. If you want to redirect all traffic from HTTP to HTTPS, which you should, enable mod_rewrite:
a2enmod rewrite
On 12.04 the file is named without .conf:
vim /etc/apache2/sites-enabled/000-default
And add the following:
|
RewriteEngine On RewriteCond %{HTTPS} off RewriteRule (.*) https://%{HTTP_HOST}%{REQUEST_URI} |
Somewhere in the <Virtualhost> part.
Don’t forget to restart Apache:
service apache2 restart
Configure Horizon
Edit the dashboard config:
vim /etc/openstack-dashboard/local_settings.py
Add the following if you are using SSL:
CSRF_COOKIE_SECURE = True
SESSION_COOKIE_SECURE = True
USE_SSL = True
现在,你可以访问https://158.132.20.37/horizon了。